Alright, let’s talk about that big, beautiful box sitting in your kitchen. Inside is your new dishwasher, a silent hero ready to tackle mountains of dirty dishes. The excitement is real, but so is that little voice in your head wondering, “How on earth do I hook this thing up?” You’re not alone. Figuring out How To Connect Dishwasher To Water Line is the final hurdle between you and a world of sparkling clean plates. But here’s the good news: it’s totally a project you can handle. This guide is your new best friend. We’re not just going to show you the steps; we’re going to turn you into a confident, kitchen-savvy DIYer. Let’s roll up our sleeves and get this done.
Before You Begin: The Pre-Installation Checklist
Ever tried to build a puzzle without all the pieces? It’s frustrating. The same goes for installing a dishwasher. A little prep work goes a long way and saves you from those frantic mid-project trips to the hardware store. Let’s get our ducks in a row.
What Tools and Materials Will I Need?
Having the right tools on hand makes the job smoother and safer. You don’t need a professional workshop, just a few key items.
- Adjustable Wrenches (2): One to hold a fitting steady, and one to tighten. This is your most important tool.
- Pliers: A good pair of channel-lock or slip-joint pliers is always handy.
- Bucket and Towels: Spills happen. It’s not a matter of if, but when. Be prepared!
- Teflon Tape (Plumber’s Tape): Essential for creating a watertight seal on threaded pipe connections.
- Dishwasher Installation Kit: This is a lifesaver. Most kits include a new braided steel water supply line (usually 6 feet) and the necessary brass fittings, like a 3/8″ compression x 3/4″ hose bib elbow.
- Drill (optional): Only if you need to drill a new hole in your cabinet to run the lines.
- Flashlight or Headlamp: It’s dark under that sink!
A Pro Tip from Our In-House Technician, John Carter: “Don’t reuse the old water line. Seriously. For the few bucks a new braided steel line costs, you’re buying peace of mind against a future leak. The rubber seals on an old line can degrade and fail without warning.”
Safety First: The Golden Rules
- Turn Off the Power: Go to your circuit breaker box and shut off the power to the dishwasher. If you’re not sure which breaker it is, turn off the main breaker to be extra safe.
- Turn Off the Water: Locate the hot water shut-off valve under your kitchen sink. It’s usually a small, oval-shaped handle. Turn it clockwise until it stops. If you don’t have a dedicated shut-off for the sink, you’ll need to turn off the main water supply to your house.
Step-by-Step: How to Connect Dishwasher to Water Line
With your prep work done, it’s time for the main event. We’ll take this one step at a time. Breathe easy, you’ve got this.
- Disconnect the Old (If Applicable): If you’re replacing an old dishwasher, place towels under the water line connection. Use your wrenches to loosen and remove the old water supply line from both the shut-off valve and the dishwasher. A little water will drip out, which is what the bucket and towels are for.
- Prepare the New Connection: Your new dishwasher will have a water inlet, usually a threaded male connection at the front, bottom-left corner. You’ll need to attach the 90-degree elbow fitting that came in your installation kit to this inlet.
- Wrap the dishwasher’s inlet threads with Teflon tape 2-3 times in a clockwise direction. This ensures the tape tightens as you screw on the fitting.
- Hand-tighten the elbow fitting, then use a wrench to give it another quarter- to half-turn. The goal is snug, not superhuman tight. Overtightening can crack the plastic inlet or damage the threads.
- Position the Dishwasher and Route the Line: Carefully slide the dishwasher part-way into its cabinet space. Before you push it all the way in, feed the new braided water supply line from under the sink, through the cabinet hole, to the front of the dishwasher. Make sure the line isn’t kinked or twisted.
- Connect the Line to the Dishwasher: Attach the appropriate end of your new braided supply line to the 90-degree elbow fitting you just installed. This is usually a compression fitting. Tighten it by hand, then use your wrench for that final snug turn.
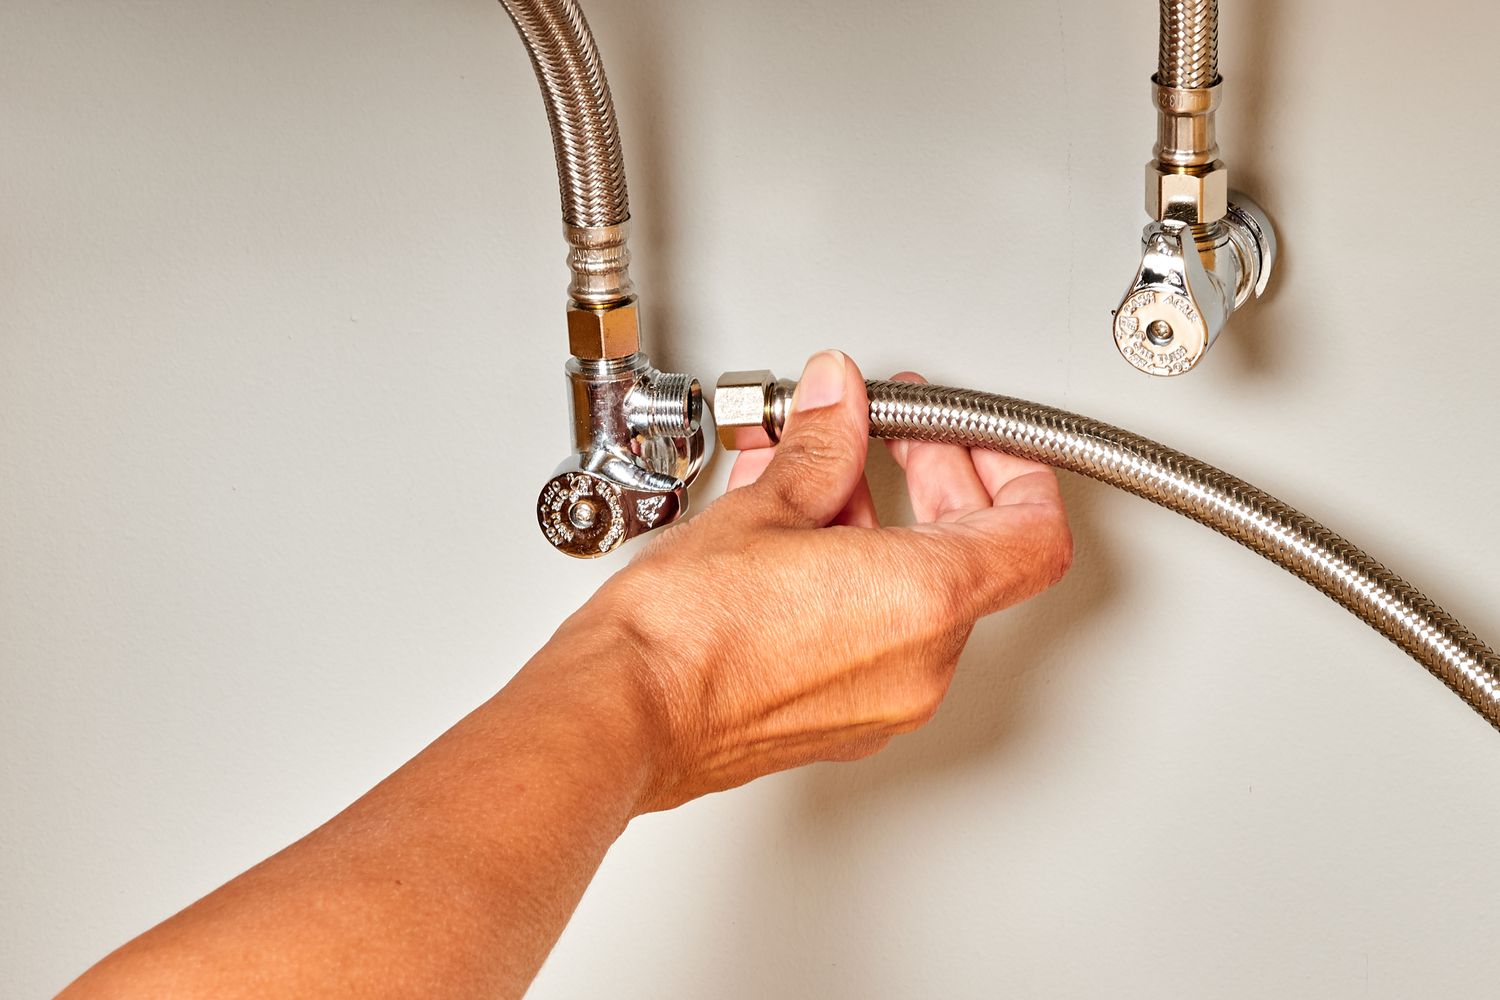
- Connect the Line to the Hot Water Supply: Under the sink, connect the other end of the supply line to the hot water shut-off valve. Again, tighten by hand first, then use your two wrenches—one to hold the valve steady and one to tighten the nut on the supply line. This prevents you from putting stress on your home’s plumbing pipes.
- The Moment of Truth: Checking for Leaks: This is the most critical step.
- Make sure all connections are snug.
- Slowly turn the hot water shut-off valve back on (counter-clockwise).
- Listen for any hissing sounds and carefully inspect all your new connections (at the valve and at the dishwasher) for any drips. Use your flashlight and a dry paper towel to wipe the connections; any moisture will show up instantly.
- If you see a leak, turn the water off immediately and tighten the connection slightly (about an eighth of a turn). Then, test again.
- Final Steps: Once you’re confident there are no leaks, you can connect the drain hose and plug in the power cord. Carefully slide the dishwasher the rest of the way into the cabinet, making sure not to kink any of the lines. Secure the dishwasher to the countertop with the provided brackets. Turn the power back on at the breaker. Run a short rinse cycle to double-check that everything is working perfectly.
Why Does a Dishwasher Use Hot Water, Anyway?
Have you ever wondered why we go through the trouble of connecting the dishwasher to the hot water line? Can’t it just heat the water itself?
Yes, it can, but connecting to the hot water line is far more efficient. It gives the dishwasher a head start, meaning it doesn’t have to work as hard or use as much electricity to heat cold water up to the optimal washing temperature (usually around 120-140°F or 50-60°C). This saves time, energy, and money on your utility bills.
Ready for an Upgrade or Need New Parts?
If you’re in the market for a new machine or just need a reliable installation kit, here are some top-rated options to consider. A great dishwasher is one of the best investments you can make for your kitchen.
|
Our Picks for the Best Dishwasher in 2026
As an Amazon Associate, we earn from qualifying purchases.
|
||
| Num | Product | Action |
|---|---|---|
| 1 | COMFEE\' Portable Mini Dishwasher Countertop with 5L Built-in Water Tank for Apartments& RVs, No Hookup Needed, 6 Programs, 360° Dual Spray, 162℉ High-Temp& Air-Dry Function |

|
| 2 | COMFEE\' Countertop Dishwasher, Portable Dishwasher with 6L Built-in Water Tank, Mini Dishwasher with More Space Inside, 7 Programs, UV Hygiene& Auto Door Open, for Apartments, Dorms& RVs, White |
|
| 3 | HAVA Countertop Dishwasher, 6 Programs Portable Dishwashers with 5L Built-in Water Tank, No Hookup Needed, Baby Care & Air-Drying Function for Apartments and RVs |
|
| 4 | HAVA 2025 NEW Upgraded Countertop Dishwasher with Water Softener and Enhanced Energy Efficiency, Portable Dishwasher with 8 Wash Programs, Child Lock & Delayed Start Function, No Installation Needed |
|
| 5 | COMFEE\' Portable Mini Dishwasher Countertop with 5L Built-in Water Tank for Apartments& RVs, No Hookup Needed, 6 Programs, 360° Dual Spray, 162℉ High-Temp& Air-Dry Function |
|
| 6 | NOVETE Portable Countertop Dishwashers, Compact Dishwashers with 5L Built-in Water Tank & Inlet Hose, 5 Washing Programs, Baby Care, Air-Dry Function and LED Light for Small Apartments |
|
| 7 | HAVA Countertop Dishwasher with Water Softener and Enhanced Energy Efficiency, Portable Dishwasher with 8 Wash Programs, Child Lock & Delayed Start Function, No Installation Needed - Misty Lilac |
|
| 8 | AIRMSEN Portable Countertop Dishwashers, 5 Washing Programs Mini Dishwashers with 5 L Built-in Water Tank and Double-layered Glass Door, No Hookup Needed for Home, Apartments & RVs |
|
| 9 | Farberware Portable Countertop Dishwasher with 5-Liter Built-in Water Tank - 5-Program System for Home, RV, and Apartment - Wash Dishes, Glass, and Baby Products |
|
| 10 | AIRMSEN Portable Countertop Dishwashers, 5 Washing Programs Mini Dishwashers with 5 L Built-in Water Tank and Double-layered Glass Door, No Hookup Needed for Home, Apartments & RVs |
|
Beyond the Connection: Optimizing Your Dishwasher’s Performance
Now that you know how to connect dishwasher to water line, let’s make sure you get the most out of your new appliance. A proper connection is just the beginning.
- Run Hot Water First: Before starting a cycle, run the hot water at your kitchen sink until it gets hot. This ensures the first fill of your dishwasher is with hot water from the start, improving cleaning performance.
- Don’t Pre-Rinse (Seriously!): Modern dishwashers and detergents are designed to work on food soils. The enzymes in the detergent actually need something to latch onto. Just scrape off large food chunks and let the machine do the work. You’ll save thousands of gallons of water a year. For more tips, check out [our complete guide to loading a dishwasher correctly].
- Use a Rinse Aid: This is non-negotiable, especially if you have hard water. Rinse aid helps water sheet off dishes, preventing spots and helping them dry much faster and more effectively.
- Clean Your Filter: Most new dishwashers have a manual filter at the bottom of the tub. Check and rinse it once a month to prevent odors and ensure your dishwasher is cleaning at its best.
Frequently Asked Questions (FAQ)
Q1: Can I connect my dishwasher to the cold water line?
A: While technically possible for some models, it is strongly discouraged. The dishwasher will have to use its internal heater to bring the water up to temperature, which significantly increases cycle time and energy consumption, leading to higher electricity bills. Always connect to the hot water line.
Q2: How tight should the water line fittings be?
A: The rule of thumb is “snug plus a quarter-turn.” Over-tightening is a common mistake that can damage the threads or crush the rubber gaskets, ironically causing a leak. Use a wrench to tighten until you feel firm resistance, then give it one last small turn.
Q3: Do I need to hire a plumber to install a dishwasher?
A: For a straightforward replacement where all the plumbing and electrical is already in place, it’s a very manageable DIY project for most homeowners. However, if you need to install a new water line, add a new shut-off valve, or do electrical work, it’s always best to call a licensed plumber or electrician.
Q4: What is the “high loop” for the drain hose?
A: The high loop is a crucial part of the drain line installation. You must loop the drain hose up as high as possible under the sink before connecting it to the garbage disposal or sink drain. This prevents dirty water from the sink from flowing back into your dishwasher.
Q5: What’s the best type of water supply line to use?
A: A braided stainless steel supply line is the industry standard and the best choice. They are flexible, durable, and highly resistant to bursting. Avoid cheap plastic or vinyl lines, as they can become brittle and fail over time.
You Did It! Welcome to a Cleaner Kitchen
Congratulations! You’ve successfully navigated the process of how to connect dishwasher to water line. You’ve not only installed an appliance but also gained valuable skills and a deeper understanding of how your kitchen works. By taking the time to do it right, you’ve ensured your new dishwasher will perform efficiently and reliably for years to come. Now, go ahead and load it up—you’ve earned a break from washing dishes by hand.
Have any tips or experiences from your own installation? Share them in the comments below! We’d love to hear from you.